How to Use React Hook Form + Zod with Next.js Server Actions
#react-hook-form, #zod, #typescript, #nextjs, #form validation, #server actions, #react
Aug 26, 202414 min read

Handling form validations natively in React can be cumbersome and time-consuming—something you’ve probably experienced firsthand. Fortunately, by using React Hook Form and Zod together, you can streamline this process and kiss your struggles goodbye. 😌
React Hook Form is a lightweight, performant library for managing and validating forms, while Zod is a powerful schema declaration and validation tool. Together, they help you manage form state and validation effectively on both the client and server sides.
In this tutorial, you'll learn:
- how to create Zod schemas
- how to validate form data with React Hook Form
- how to handle images with React Hook Form
- sending form data to Next.js server actions
- how to handle potential errors when using server actions
To see the implementation in action, you can check out the live example on CodeSandbox. (I've run out of credits 🥲 but you can still fork it.) Let's dive in!
Why use React Hook Form + Zod
So why combine Zod and React Hook Form (RHF) instead of using custom validation logic?
Writing custom validation is fine for simple forms. However, complexity increases as forms grow, along with component state. RHF simplifies form management by reducing boilerplate code and minimizing re-renders, but it might fall short on robust schema validation.
That’s where Zod shines. Zod is a TypeScript-first schema library that integrates seamlessly with RHF, offering efficient form management and powerful, type-safe validation. One significant advantage of Zod is its support for reusable schemas, allowing you to define a schema once and reuse it across different forms or purposes.
By integrating Zod with React Hook Form, you can build forms that are manageable, robust, and scalable, with data validated consistently against predefined rules. Let’s explore how to implement this effectively.
Getting Started
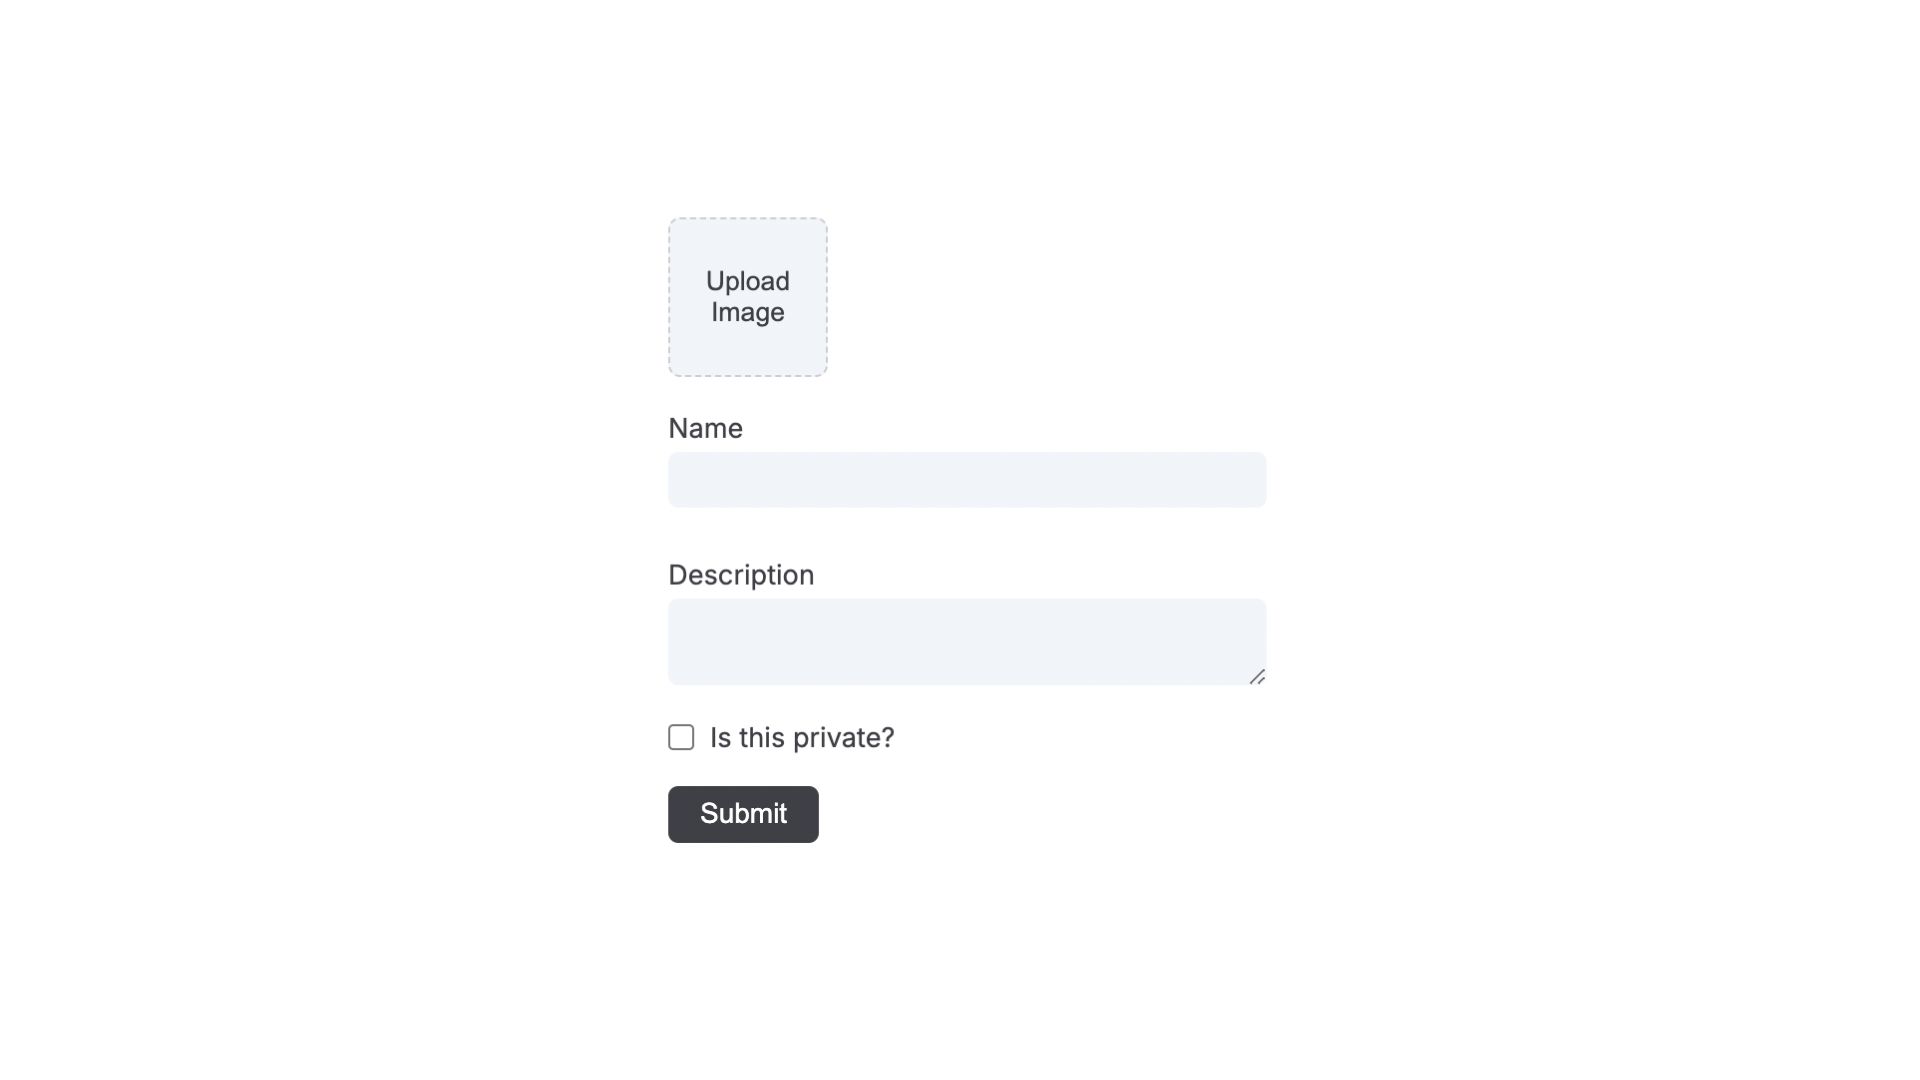
Assuming you already have a Next.js (app router) project set up, let’s dive into building our schema. We’ll create a form with four inputs: name, description (textarea), private (checkbox), and an image field.
Our goal is to:
- allow user inputs
- preview the uploaded image
- validate the data using the Zod schema
- send the validated data to a server action for mutation
Creating the Schema
To get started, we'll need to install Zod. Run the following command to install Zod.
npm install zod
We’ll create a Zod schema that reflects the structure of the form. This schema will handle validation for each field.
Create a validation folder to store all your validation schema logic. You can put this in a utils folder in your project’s directory whether inside or outside the app/src folder.
// utils/validation/form.ts

import { z } from 'zod';

// Define the file size limit and accepted file types as constants
const MAX_FILE_SIZE = 3 * 1024 * 1024; // 3MB in bytes
const ACCEPTED_IMAGE_TYPES = ['image/jpeg', 'image/png'];

export const formSchema = z.object({
  name: z
    .string({ message: 'Name is required' })
    .min(3, 'Name should be at least 3 characters'),
  description: z
    .string()
    .min(10, 'Description should be at least 10 characters long')
    .optional()
    .or(z.literal('')),
  private: z.boolean().optional(),
  image: z
    .instanceof(File)
    .refine(
      (file) => file.size <= MAX_FILE_SIZE,
      `Image size must be less than ${MAX_FILE_SIZE / 1024 / 1024}MB.`
    )
    .refine(
      (file) => ACCEPTED_IMAGE_TYPES.includes(file.type),
      `Only the following image types are allowed: ${ACCEPTED_IMAGE_TYPES.join(
        ', '
      )}.`
    )
    .optional()
    .nullable(),
});

export type FormSchema = z.infer<typeof formSchema>;
We’ve created a Zod schema that aligns with the form structure, ensuring each field is validated correctly. Let’s go through it step by step.
name: Thenamefield is a required string. We specify a custom error message for when this field is left empty, and we enforce a minimum length of 3 characters.description: This field is optional and can either be a string or an empty value. If provided, the description must be at least 10 characters long. The.optional().or(z.literal(""))allows the description to be either omitted or left blank without causing a validation error.private: This optional boolean field corresponds to a checkbox that users can select to make the content private.image: This is where things get a bit more complex. Theimagefield is optional and can either be aFileobject ornullas specified by.nullable(). We use two.refinemethods to enforce specific validation rules:- The first refinement checks that the file size doesn’t exceed the maximum allowed size (3MB in this case).
- The second refinement ensures that only certain image types (JPEG, PNG) are accepted.
These checks ensure that users can only upload valid images within the allowed size and format limits.
Credit where it’s due: I adapted the file validation logic from this helpful resource - Use Zod to validate file input.
Finally, we export the type inferred from the schema using
z.infer. This inferred type can be used elsewhere in our code to maintain type safety, ensuring that the data adheres to the schema’s rules.
Integrating the Schema into the Form
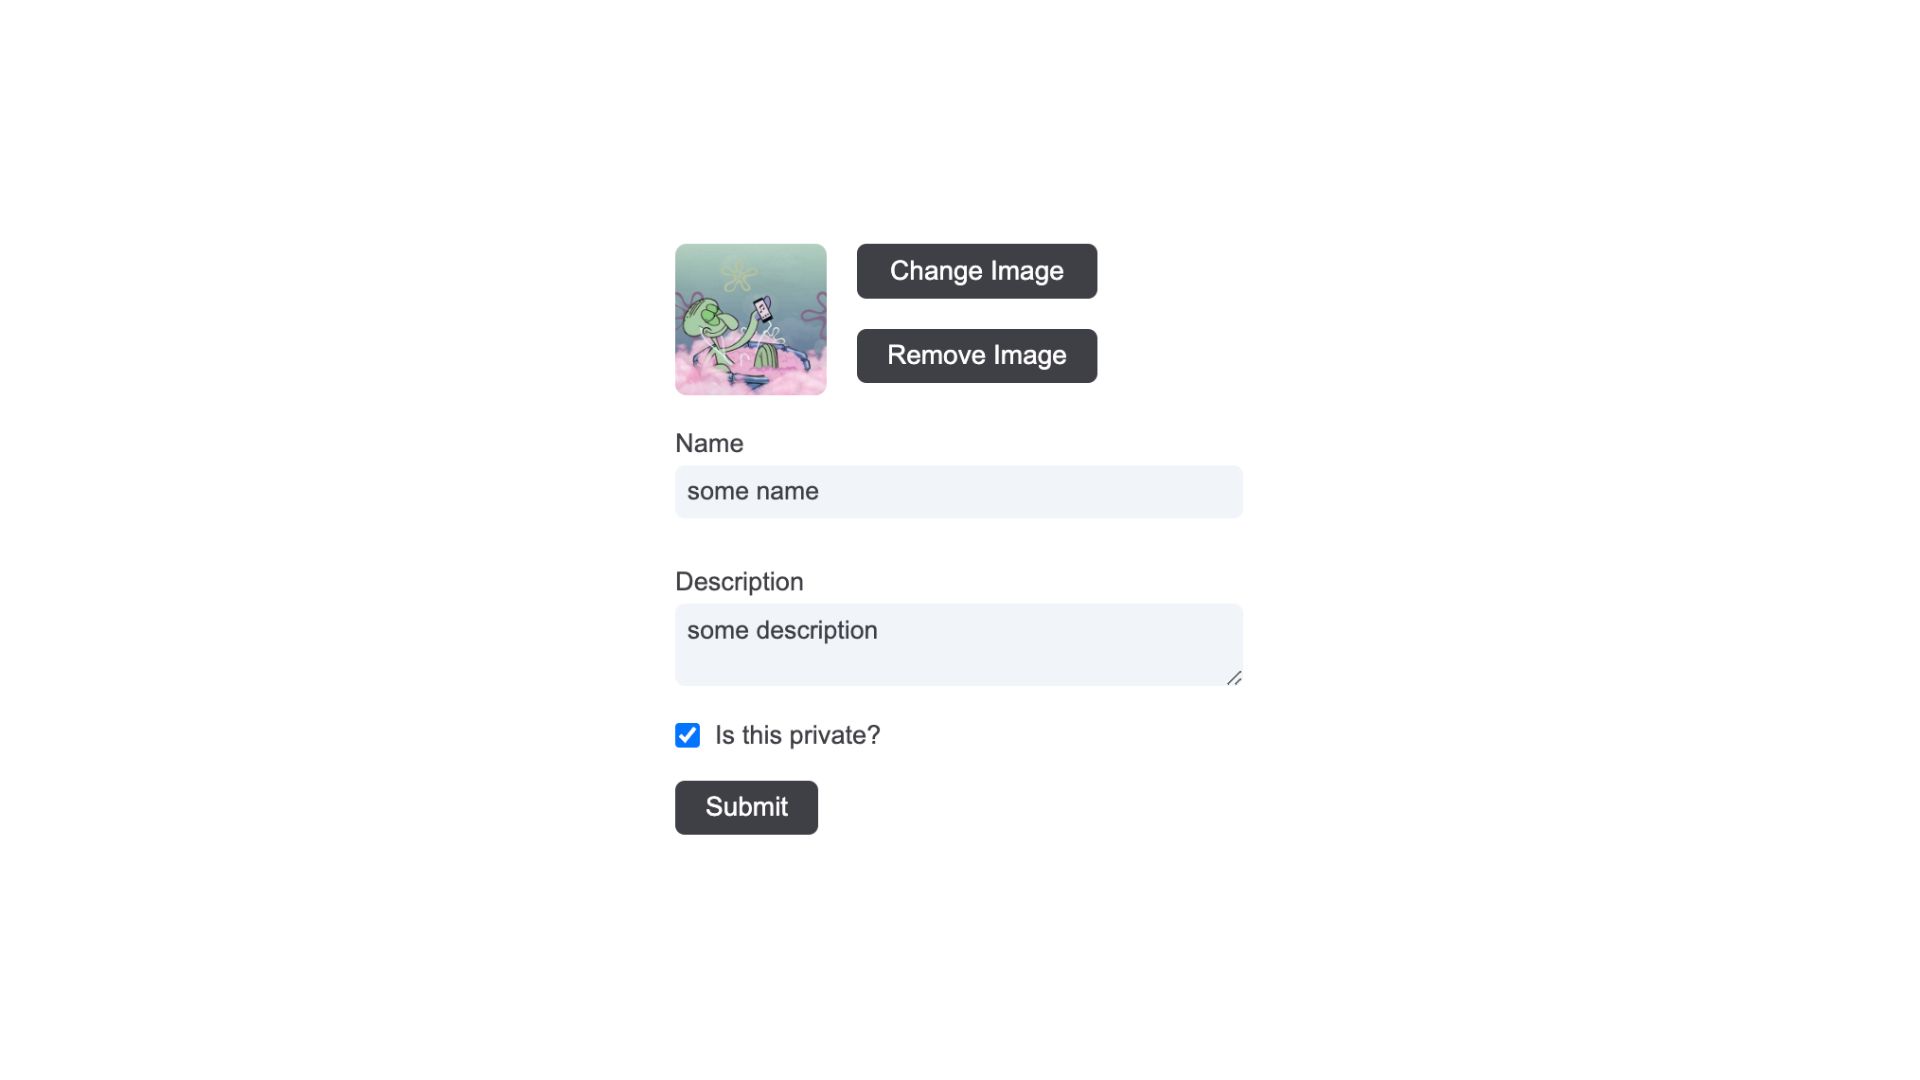
With our Zod schema defined, we can now integrate it into a form component to handle user inputs, preview images, and validate data. Eventually, when populated this is what our form will look like.
To get started, we need to install react-hook-form and its resolvers dependency so we can get it to play nicely with Zod.
npm install react-hook-form @hookform/resolvers
Below is an example of how to implement this using React Hook Form, Zod, and Next.js. In your form component, you can add the following snippet.
// app/components/Form.tsx

'use client';

import { useRef, useState } from 'react';
import { SubmitHandler, useForm } from 'react-hook-form';
import { zodResolver } from '@hookform/resolvers/zod';
import { FormSchema, formSchema } from '../validation/formSchema';

import Image from 'next/image';
import { submitForm } from '../actions/form';

function RHForm() {
  // initialize the useForm hook with the Zod resolver and default values
  const form = useForm<FormSchema>({
    resolver: zodResolver(formSchema),
    defaultValues: { private: false, image: null },
  });

  const {
    register,
    handleSubmit,
    setValue,
    formState: { errors, isSubmitting },
  } = form;

  const hiddenFileInputRef = useRef<HTMLInputElement | null>(null);
  const [preview, setPreview] = useState<string | null>(null);

  // function to handle file input changes
  const handleFileChange = (event: React.ChangeEvent<HTMLInputElement>) => {
    const file = event.target.files?.[0];

    if (file) {
      const reader = new FileReader();

      reader.onloadend = () => {
        setPreview(reader.result as string);
        setValue('image', file); // manually set the image in the form state
      };

      reader.readAsDataURL(file);
    } else {
      setPreview(null);
    }
  };

  const removeImage = () => {
    setPreview(null);
    hiddenFileInputRef.current!.value = '';
    setValue('image', null);
  };

  const triggerFileInput = () => hiddenFileInputRef.current?.click();

  const onSubmitForm: SubmitHandler<FormSchema> = async (data) => {
    // call the server action
    await submitForm(data);
  };

  return (
    <form onSubmit={handleSubmit(onSubmitForm)}>
      <div className='upload'>
        {!preview && (
          <button type='button' onClick={triggerFileInput}>
            Upload Image
          </button>
        )}

        {preview && (
          <div className='preview'>
            <Image
              src={preview}
              className='img'
              alt='profilePicture'
              height={50}
              width={50}
            />

            <div className='buttons'>
              <button type='button' onClick={triggerFileInput}>
                Change Image
              </button>

              <button type='button' onClick={removeImage}>
                Remove Image
              </button>
            </div>
          </div>
        )}
        <input
          {...register('image')}
          ref={hiddenFileInputRef}
          hidden
          type='file'
          onChange={handleFileChange}
        />
        <p className='error'>{errors.image && errors.image.message}</p>
      </div>

      <div className='field-wrap'>
        <label htmlFor='name'>Name </label>
        <input {...register('name')} type='text' />
        <p className='error'>{errors.name && errors.name.message}</p>
      </div>

      <div className='field-wrap'>
        <label htmlFor='description'>Description </label>
        <textarea {...register('description')} />
        <p className='error'>
          {errors.description && errors.description.message}
        </p>
      </div>

      <div className='private'>
        <input {...register('private')} type='checkbox' />
        <label htmlFor='private'>Is this private? </label>
        <p>{errors.private && errors.private.message}</p>
      </div>

      <button className='submit' disabled={isSubmitting}>
        {isSubmitting ? 'Loading' : 'Submit'}
      </button>
    </form>
  );
}

export default RHForm;
This form component is designed as a client-side component using react-hook-form . Let’s break down how it works.
Understanding the useForm Hook
We use the useForm hook from react-hook-form to manage the form’s state and validation. It returns several functions we will plug into our form:
register: This method connects each input to RHF, enabling validation and state management. By using theregisterfunction and providing the input's name, you automatically bind event handlers likeonChange,onBlur, andnameto the input. Instead of assigning these handlers manually, the spread operator applies them in one step, as seen in<input {...register('name')} />. You can learn more about it here.handleSubmit: This function handles form submission. It checks if the form data is valid, and if so, passes the data to theonSubmitFormfunction.setValue: This method allows us to programmatically set the value of a registered field and update the form state.formState: This object holds the overall state of the form, including validation errors and submission status. It keeps track of the user’s interactions with the form.
Resolver and Default Values
The useForm hook accepts an optional configuration object. In our case, we’ve provided two key properties:
resolver: This allows us to integrate a schema validation library, such as Zod, with RHF. By usingzodResolver, we ensure that the form data adheres to our Zod schema before submission.defaultValues: This property sets initial values for the form fields.
Registering the File Input
While the register method handles most inputs seamlessly, file inputs require additional handling. Therefore, for the input:file, we added our own onChange handler and a ref property. Let’s explore why.
Because we chose to hide the default UI of the file input, we instead display a button that when clicked, triggers the file selection dialog which is handled by the triggerFileInput function.
<button type="button" onClick={triggerFileInput}>
  Upload Image
</button>
Once a file is selected, the handleFileChange function manages the file upload process. It updates the preview state and sets the image in RHF’s form state. We manually set the image in the form state because we’ve overridden the ref property on the file input. Under the hood, RHF relies on ref to track input values, but since a custom ref was used, we need to use setValue to update the form state manually.
These sections of the documentation might be particularly useful to you — How to share ref usage and What if you don’t have access to a ref?
With this setup, we can update the form state and use hiddenFileInputRef to trigger file input changes, allowing us to display a preview of the uploaded image and manage file changes easily.
Submitting the Form
The onSubmitForm function handles form submission. We use SubmitHandler<FormSchema> to define the expected shape of the form data.
Upon successful validation, the form data is logged in the console. If there are validation errors, they are displayed beneath the corresponding fields, as managed by the errors object from formState. This object allows us to conditionally render error messages.
<p className="error">{errors.image && errors.image.message}</p>
Working with the Server Action
Our server action is responsible for handling form submissions and performing data mutations, such as sending the form data to a database or other external services.
To create our server action, start by creating an actions folder inside the app directory and adding a form.ts file.
// app/actions/form.ts

'use server';

import { formSchema } from '../validation/formSchema';

export async function submitForm(formData: FormSchema) {
  console.log(formData);
}
Note that server actions must include the React "use server" directive. In this example, we're simply logging the data. Next, we'll call this action from our client component. Update the onSubmitForm function in your form component.
import { submitForm } from '../actions/form';

const onSubmitForm: SubmitHandler<FormSchema> = async (data) => {
  // call the server action
  await submitForm(formData);
};
If you attempt to submit the form data in this way, you'll likely encounter the following error: Uncaught Error: Only plain objects, and a few built-ins, can be passed to Server Actions. Classes or null prototypes are not supported. This error occurs because FormData is not recognized as a plain object by the server action handler, which expects simple, serializable data types. Additionally, you cannot directly pass a file object to a server action since it's a browser-specific API.
The Correct Approach
To resolve this error, you can serialize the data before passing it to the server action. One approach is to create a new FormData instance and append the required fields to it, ensuring that the data is correctly formatted for the server.
For more details on alternative solutions, you might find this Stack Overflow post helpful. It covers various ways to handle similar issues when working with server actions.
Let’s see how we can implement this approach by updating the server action.
The function returns an object with either errors or data. If validation is successful, it returns a message indicating that the data was received and processed, otherwise it returns the errors.
'use server';

import { formSchema } from '../validation/formSchema';
import { z } from 'zod';

export const transformZodErrors = (error: z.ZodError) => {
  return error.issues.map((issue) => ({
    path: issue.path.join('.'),
    message: issue.message,
  }));
};

export async function submitForm(formData: FormData) {
  try {
    // fake a delay
    await new Promise((resolve) => setTimeout(resolve, 1000));

    //validate the FormData
    const validatedFields = formSchema.parse({
      name: formData.get('name'),
      description: formData.get('description'),
      private: formData.get('private') === 'true' ? true : false,
      cover: formData.get('image'),
    });

    console.log({ validatedFields });

    // send validated data to database here

    return {
      errors: null,
      data: 'data received and mutated',
    };
  } catch (error) {
    if (error instanceof z.ZodError) {
      return {
        errors: transformZodErrors(error),
        data: null,
      };
    }

    return {
      errors: {
        message: 'An unexpected error occurred. Could not create shelf.',
      },
      data: null,
    };
  }
}
We've updated the submitForm function to accept a FormData object instead of Zod’s FormSchema. We extract each field from the formData using formData.get("fieldName"). The private field is converted to a boolean because it’s submitted as a string in the form.
The extracted data is validated against our schema using formSchema.parse(). This method ensures that the incoming data meets the specified criteria, and if valid, stores it in the validatedFields object. At this point, the data is ready to be sent to the database or any other external service for further processing.
If the validation fails, Zod throws an error. Our catch block handles this, transforming Zod errors into a readable array of objects via the transformZodErrors function. Each object in the array includes a path (indicating the field with the error) and a message (describing the issue). Non-Zod errors are caught separately and return a generic error message.
By validating form data on the server with Zod and handling potential errors, we ensure that only properly formatted data is processed. This approach helps avoid issues with non-serializable data types in server actions.
Let’s use this updated server action in our form component. Below is the updated onSubmitForm function, which prepares the form data and calls the server action.
const onSubmitForm: SubmitHandler<FormSchema> = async (data) => {
  const formData = new FormData();
  formData.append('name', data.name);
  formData.append('description', data.description || '');
  formData.append('private', data.private ? 'true' : 'false');
  formData.append('image', data.image as File);

  // call the server action
  const { data: success, errors } = await submitForm(formData);

  if (errors) {
    // handle errors (e.g., display an alert notification or add error messages to the form)
  }

  if (success) {
    // handle success (e.g., display a success notification)
  }

  // fallback notification can go here
};
We start by creating a new FormData instance and using the append method to add each form field. The private field is converted to a string since FormData only accepts strings or Blob values.
Next, we pass the FormData object to the submitForm server action, where it is validated and processed. The server action returns an object containing either data (for successful submissions) or errors (for validation or other issues).
If errors are returned, you can display an alert notification or add error messages to the form. If data is returned, you could show a success notification or update the UI accordingly. A fallback notification can also be implemented for unexpected scenarios.
This approach ensures that form submissions in a Next.js application are handled effectively, with properly formatted data sent to the server, validated, and processed, while providing feedback to the user based on the result.
With these steps in place, your codebase should be ready to go! 🚀

Back to Blogs